
Raspberry Pi Pico에 위즈넷 이더넷 칩셋이 달린 W5100S-EVB-Pico 보드를 사용하여 HTTP 테스트를 해 보았습니다.
W5100S-EVB-Pico 보드의 기본 설정 법은 아래 DHCP 게시글을 참고하여 설정하시면 됩니다.
Raspberry Pi Pico (W5100S-EVB-Pico) DHCP 사용하기
Adafruit CircuitPython 7.2.5 / Raspberry Pi Pico with rp2040 에서 테스트 되었습니다. Raspberry Pi Pico에 위즈넷 이더넷 칩셋이 달린 W5100S-EVB-Pico 보드를 사용하여 DHCP 테스트를 해 보았습니다. DHCP..
rudalskim.tistory.com
RP2040-HAT-CircuitPython 라이브러리 내에 HTTP Client 테스트를 할 수 있는 아래 예제를 제공해 주고 있는데 examples/HTTP/Webclient/W5x00_WebClient.py를 참고하시면 됩니다.
import board
import busio
import digitalio
import time
import adafruit_requests as requests
from adafruit_wiznet5k.adafruit_wiznet5k import WIZNET5K
import adafruit_wiznet5k.adafruit_wiznet5k_socket as socket
##SPI0
SPI0_SCK = board.GP18
SPI0_TX = board.GP19
SPI0_RX = board.GP16
SPI0_CSn = board.GP17
##reset
W5x00_RSTn = board.GP15
print("Wiznet5k WebClient Test")
TEXT_URL = "http://wifitest.adafruit.com/testwifi/index.html"
JSON_URL = "http://api.coindesk.com/v1/bpi/currentprice/USD.json"
# Setup your network configuration below
# random MAC, later should change this value on your vendor ID
MY_MAC = (0x00, 0x01, 0x02, 0x03, 0x04, 0x05)
# IP_ADDRESS = (192, 168, 1, 100)
# SUBNET_MASK = (255, 255, 255, 0)
# GATEWAY_ADDRESS = (192, 168, 1, 1)
# DNS_SERVER = (8, 8, 8, 8)
led = digitalio.DigitalInOut(board.GP25)
led.direction = digitalio.Direction.OUTPUT
ethernetRst = digitalio.DigitalInOut(W5x00_RSTn)
ethernetRst.direction = digitalio.Direction.OUTPUT
# For Adafruit Ethernet FeatherWing
cs = digitalio.DigitalInOut(SPI0_CSn)
# For Particle Ethernet FeatherWing
# cs = digitalio.DigitalInOut(board.D5)
spi_bus = busio.SPI(SPI0_SCK, MOSI=SPI0_TX, MISO=SPI0_RX)
# Reset W5500 first
ethernetRst.value = False
time.sleep(1)
ethernetRst.value = True
# # Initialize ethernet interface without DHCP
# eth = WIZNET5K(spi_bus, cs, is_dhcp=False, mac=MY_MAC, debug=True)
# # Set network configuration
# eth.ifconfig = (IP_ADDRESS, SUBNET_MASK, GATEWAY_ADDRESS, DNS_SERVER)
# Initialize ethernet interface with DHCP
eth = WIZNET5K(spi_bus, cs, is_dhcp=True, mac=MY_MAC, debug=False)
print("Chip Version:", eth.chip)
print("MAC Address:", [hex(i) for i in eth.mac_address])
print("My IP address is:", eth.pretty_ip(eth.ip_address))
print(
"IP lookup adafruit.com: %s" % eth.pretty_ip(eth.get_host_by_name("adafruit.com"))
)
# Initialize a requests object with a socket and ethernet interface
requests.set_socket(socket, eth)
# eth._debug = True
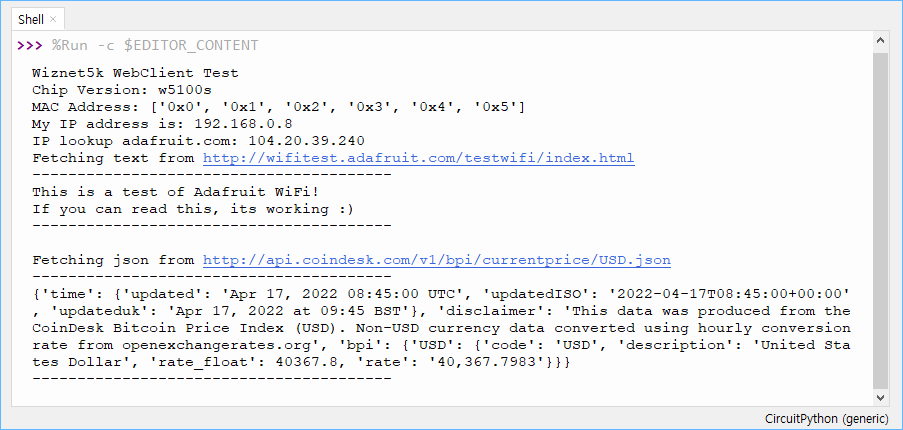
print("Fetching text from", TEXT_URL)
r = requests.get(TEXT_URL)
print("-" * 40)
print(r.text)
print("-" * 40)
r.close()
print()
print("Fetching json from", JSON_URL)
r = requests.get(JSON_URL)
print("-" * 40)
print(r.json())
print("-" * 40)
r.close()
while True:
# Maintain DHCP lease
eth.maintain_dhcp_lease()
led.value = not led.value
time.sleep(1)
print("Done!")
기본적으로 DHCP를 통해 IP를 얻어오는 것까지는 공통 코드이며 실질적인 HTTP 통신은 requests를 사용하여 지정된 URL을 GET/POST 요청하는 형태이며 수신응답은 요청된 request에 대응되는 Text 또는 JSON 형식으로 수신될 수 있습니다.
위 소스코드를 W5100S-EVB-Pico 보드에서 실행해 보니 Client에서 adafruit.com 서버쪽으로 요청을 보내고 W5100S-EVB-Pico Client 보드에서 정상적으로 Text 또는 JSON 형식의 응답이 수신됩니다.
HTTP Web Server application을 동작하기 위해서는 WSGI(Web Server Gateway Interface) 라이브러리를 먼저 설치해야 합니다. 위 게시글에서 다운로드 받은 RP2040-HAT-CircuitPython 파일의 lib 디렉터리에 보면 adafruit_wsgi 라이브러리가 있는데 이 디렉터리를 Raspberry Pi Pico 드라이브의 lib 디렉터리에 복사해야 넣습니다.
그리고 테스트 소스는 RP2040-HAT-CircuitPython 라이브러리 내에 HTTP Server 테스트를 할 수 있는 아래 예제(examples/HTTP/Webserver/W5x00_WebServer.py)를 참고하시면 됩니다.
import board
import busio
import digitalio
import time

import adafruit_requests as requests
from adafruit_wiznet5k.adafruit_wiznet5k import *
from adafruit_wsgi.wsgi_app import WSGIApp
import adafruit_wiznet5k.adafruit_wiznet5k_wsgiserver as server
import adafruit_wiznet5k.adafruit_wiznet5k_socket as socket

##SPI0
SPI0_SCK = board.GP18
SPI0_TX = board.GP19
SPI0_RX = board.GP16
SPI0_CSn = board.GP17

##reset
W5x00_RSTn = board.GP20

print("Wiznet5k WebServer Test(DHCP)")

# Setup your network configuration below
# random MAC, later should change this value on your vendor ID
MY_MAC = (0x00, 0x01, 0x02, 0x03, 0x04, 0x05)
IP_ADDRESS = (192, 168, 1, 100)
SUBNET_MASK = (255, 255, 255, 0)
GATEWAY_ADDRESS = (192, 168, 1, 1)
DNS_SERVER = (8, 8, 8, 8)

led = digitalio.DigitalInOut(board.GP25)
led.direction = digitalio.Direction.OUTPUT

ethernetRst = digitalio.DigitalInOut(W5x00_RSTn)
ethernetRst.direction = digitalio.Direction.OUTPUT

# For Adafruit Ethernet FeatherWing
cs = digitalio.DigitalInOut(SPI0_CSn)

# cs = digitalio.DigitalInOut(board.D5)
spi_bus = busio.SPI(SPI0_SCK, MOSI=SPI0_TX, MISO=SPI0_RX)

# Reset W5500 first
ethernetRst.value = False
time.sleep(1)
ethernetRst.value = True

# Initialize ethernet interface without DHCP
# eth = WIZNET5K(spi_bus, cs, is_dhcp=False, mac=MY_MAC, debug=False)
# Initialize ethernet interface with DHCP
eth = WIZNET5K(spi_bus, cs, is_dhcp=True, mac=MY_MAC, debug=False)

# Set network configuration
# eth.ifconfig = (IP_ADDRESS, SUBNET_MASK, GATEWAY_ADDRESS, DNS_SERVER)

print("Chip Version:", eth.chip)
print("MAC Address:", [hex(i) for i in eth.mac_address])
print("My IP address is:", eth.pretty_ip(eth.ip_address))

# Initialize a requests object with a socket and ethernet interface
requests.set_socket(socket, eth)

# Here we create our application, registering the
# following functions to be called on specific HTTP GET requests routes
web_app = WSGIApp()

html_string = '''
<!DOCTYPE html>
<html lang="en">
<head>
<meta charset="UTF-8">
<meta http-equiv="X-UA-Compatible" content="IE=edge">
<meta name="viewport" content="width=device-width, initial-scale=1.0">
<title>RaspberryPi Pico Web server - WIZnet W5100S/W5500</title>
</head>
<body>
<div align="center">
<H1>RaspberryPi Pico Web server & WIZnet Ethernet HAT</H1>
<h2>Network Information</h2>
<p>
Chip Version is $CHIPNAME<br>
My IP address is $IPADDRESS<br>
</p>
<h2>Control LED</h2>
<p>
<label for="led_on"></label><a href="/led_on" id="led_on"> [ON] </a><br>
</p>
<p>
<label for="led_off"></label><a href="/led_off" id="led_off"> [OFF] </a><br>
</p>
</div>
</body>
</html>
'''

html_string = html_string.replace("$CHIPNAME",eth.chip)
html_string = html_string.replace("$IPADDRESS",eth.pretty_ip(eth.ip_address))

#HTTP Request handlers
@web_app.route("/led_on")
def led_on(request):  # pylint: disable=unused-argument
    print("LED on!")
    led.value = True
    return ("200 OK", [], " led on!")

@web_app.route("/led_off")
def led_off(request): # pylint: disable=unused-argument
    print("LED off!")
    led.value = False
    return ("200 OK", [], " led off!")

@web_app.route("/")
def root(request):  # pylint: disable=unused-argument
    print("Root WSGI handler")
    # return ("200 OK", [], ["Root document"])
    return ("200 OK", [], [html_string])

# Here we setup our server, passing in our web_app as the application
server.set_interface(eth)
print(eth.chip)
wsgiServer = server.WSGIServer(80, application=web_app)

print("Open this IP in your browser: ", eth.pretty_ip(eth.ip_address))

# Start the server
wsgiServer.start()

while True:
    # Our main loop where we have the server poll for incoming requests
    wsgiServer.update_poll()
    # Maintain DHCP lease
    eth.maintain_dhcp_lease()
    # Could do any other background tasks here, like reading sensors
위 예제를 실행해 보면 Thonny의 Shell 창에 아래와 같은 로그가 나옵니다.
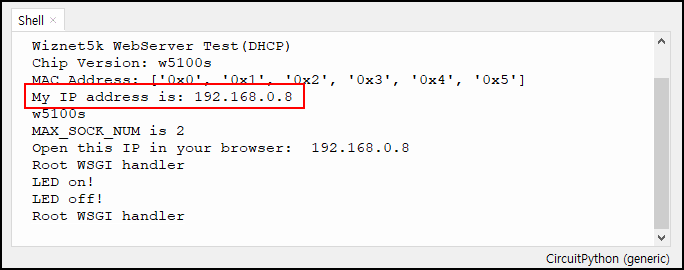
핸드폰 또는 PC의 웹브라우저를 사용하여 Server가 구동된 IP인 192.168.0.8로 접속해 봅니다.
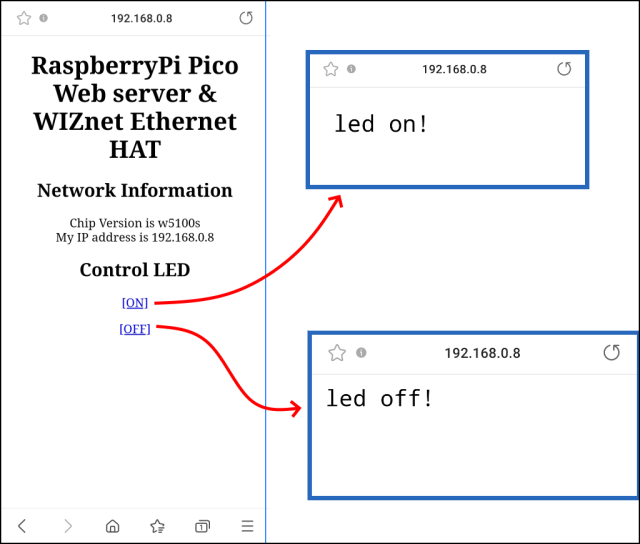
아래는 제가 핸드폰으로 Raspberry Pi Pico(W5100S-EVB-Pico)에 연결한 화면을 캡처한 이미지입니다.
위 소스코드의 html_string에 입력된 HTML 소스코드가 보여지며 아랫부분의 ON/OFF 라벨을 클릭 시 @web_app.route에 의해 설정된 각 각의 led_on/led_off 페이지가 보여지며 동시에 보드의 LED도 on/off 됩니다.
W5100S-EVB-Pico 보드가 이더넷을 지원하여 쉽게 HTTP Client/Server 테스트를 해 볼 수 있었습니다.
'Hardware > Raspberry PI' 카테고리의 다른 글
| Raspberry Pi Pico에서 MicroSD 사용하기 (0) | 2022.04.19 |
|---|---|
| Raspberry Pi Pico (W5100S-EVB-Pico) 확장 보드 제작 (0) | 2022.04.18 |
| Raspberry Pi Pico에서 UART 사용하기 (0) | 2022.04.17 |
| Raspberry Pi Pico (W5100S-EVB-Pico) DHCP 사용하기 (0) | 2022.04.14 |
| Raspberry Pi Pico에서 OLED 사용하기 (I2C 사용) (0) | 2022.04.03 |


댓글