ESP-12F 모듈을 사용하던 중 외부 파일에서 데이터를 읽어와야 하는 경우가 생겼습니다.
모듈 자체에 MicroSD 카드가 있지는 않지만 인터페이스는 지원이 되어 MicroSD 카드를 연결하면 될 것 같아 조금 검색을 해 보니 ESP-12F 모듈에 쉽게 MicroSD 카드를 연결할 수 있는 것처럼 보여 간단히 하드웨어를 구성하여 테스트해 보았습니다.
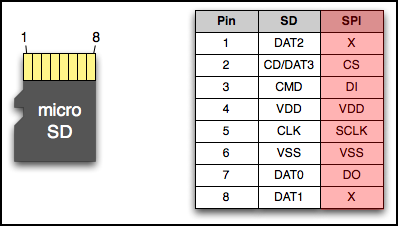
우선 MicroSD 카드의 인터페이스는SD 모드와 SPI 모드 총 2가지 인터페이스를 지원합니다.
이 2가지 인터페이스중에서 ESP-12F 모듈과 쉽게 연결 가능한 SPI 모드를 사용하여 테스트하였습니다.
아래 이미지의 오른쪽 붉은색으로 표시한 부분이 SPI에서 사용되는 핀들인데 MicroSD 카드에서 1번, 8번을 제외하고 가운데 6핀을 사용하여 동작됩니다. MicroSD 카드의 인터페이스는 3.3V로 동작되기 때문에 부가적인 부품없이 바로 ESP-12F 모듈에 연결하여 사용할 수 있습니다.
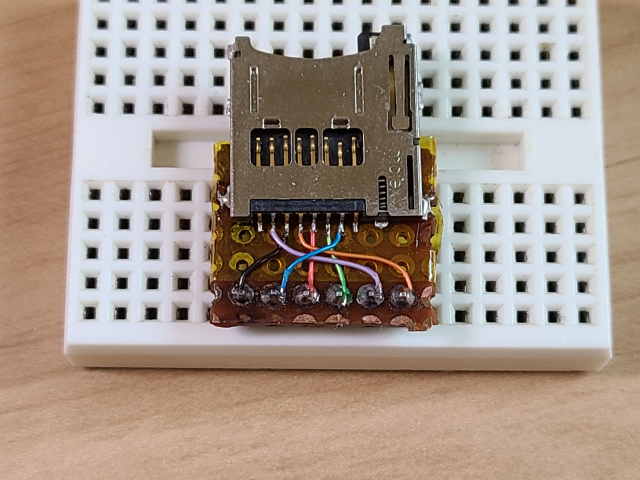
재활용 박스에 있던 PCB에서 MicroSD 카드 소켓을 분리 후 얇은 선을 사용하여 MicroSD 소켓의 각 핀에 연결하였습니다.

간단히 테스트를 위해 만들다 보니 소켓이 견고하게 납땜이 되지 않아 불안정합니다.
MicroSD 카드를 넣고 뺄 때 납땜한 부위가 떨어지지 않도록 조심해서 사용해야 합니다.
제가 사용하는 ESP-12F 보드에 맞게 배선을 하였습니다.
아래 이미지의 오른쪽의 작은 ESP-12F 모듈의 포트(녹색 바탕의 GPIO)와 출력측 커넥터를 참고하시면 됩니다.
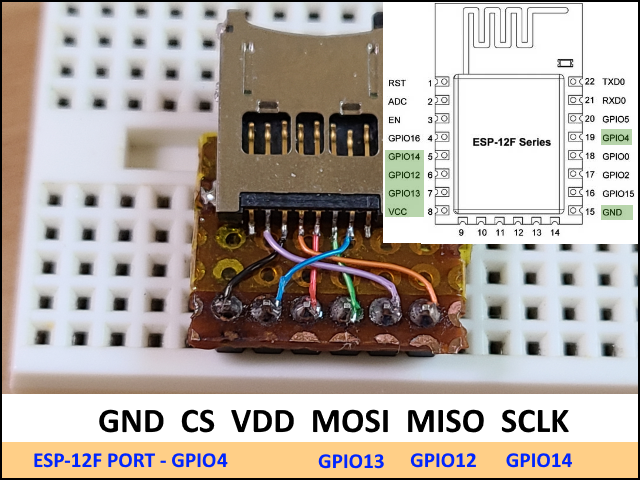
이런 식으로 바로 꽂을 수 있도록 커넥터에 배선을 맞춰주었습니다.
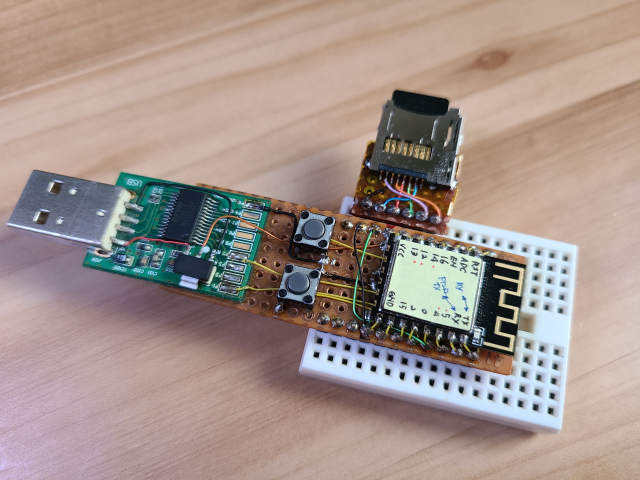
하드웨어는 완성되었으니 ESP8266에서 제공되는 예제를 사용하여 테스트해 보았습니다.
테스트는 최신 버전인 3.0.2 버전(2022.02.24일 현재)을 사용하여 테스트되었습니다.
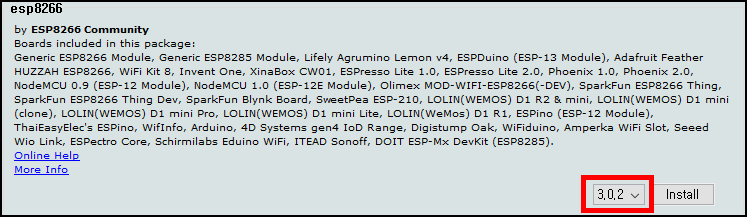
보드를 Generic ESP8266 module로 설정 후 아래 예제 코드를 작성하여 MicroSD 카드의 정보를 읽어 보았습니다.
#include <SPI.h>
#include <SD.h>

void setup() {
  Serial.begin(9600);

  Serial.print("\nInitializing SD card...");

  if (!SD.begin(4)) {
    Serial.println("initialization failed!");
    return;
  }
  Serial.println("initialization done.");

  Serial.println();
  Serial.print("Card type:         ");
  switch (SD.type()) {
    case 0:
      Serial.println("SD1");
      break;
    case 1:
      Serial.println("SD2");
      break;
    case 2:
      Serial.println("SDHC");
      break;
    default:
      Serial.println("Unknown");
  }

  Serial.print("Cluster size:          ");
  Serial.println(SD.clusterSize());
  Serial.print("Blocks x Cluster:  ");
  Serial.println(SD.blocksPerCluster());
  Serial.print("Blocks size:  ");
  Serial.println(SD.blockSize());

  Serial.print("Total Blocks:      ");
  Serial.println(SD.totalBlocks());
  Serial.println();

  Serial.print("Total Cluster:      ");
  Serial.println(SD.totalClusters());
  Serial.println();

  uint32_t volumesize;
  Serial.print("Volume type is:    FAT");
  Serial.println(SD.fatType(), DEC);

  volumesize = SD.totalClusters();
  volumesize *= SD.clusterSize();
  volumesize /= 1000;
  Serial.print("Volume size (Kb):  ");
  Serial.println(volumesize);
  Serial.print("Volume size (Mb):  ");
  volumesize /= 1024;
  Serial.println(volumesize);
  Serial.print("Volume size (Gb):  ");
  Serial.println((float)volumesize / 1024.0);

  Serial.print("Card size:  ");
  Serial.println((float)SD.size() / 1000);

  FSInfo fs_info;
  SDFS.info(fs_info);

  Serial.print("Total bytes: ");
  Serial.println(fs_info.totalBytes);

  Serial.print("Used bytes: ");
  Serial.println(fs_info.usedBytes);
}

void loop(void) {
}
혹시 기본적인 Generic ESP8266 module의 사용방법이 궁금하다면 아래 게시글을 참고해 주시기 바랍니다.
ESP-12F 모듈 사용하기
아두이노 IDE에서 ESP-12F 모듈을 사용하려면 모듈 보드를 등록/추가 해 줘야 합니다. 아두이노 IDE를 실행 후 File -> Preferences를 선택 후 아래 순서대로 추가합니다. 1. Additional Boards Manager URLs를 선..
rudalskim.tistory.com
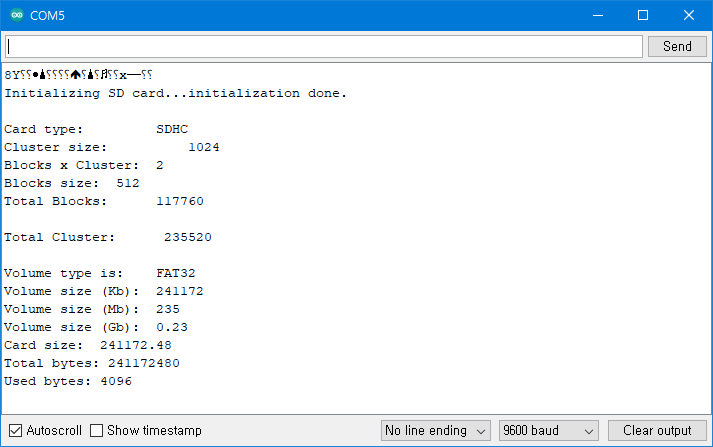
위 코드를 실행해 보니 제가 테스트용으로 사용하는 MicroSD 카드의 정보를 제대로 읽어왔습니다.
혹시나 잘못되어 MicroSD 카드가 손상되는 경우가 발생될지 몰라 잘 사용하지 않는 256MB의 아주 오래된 MicroSD 카드로 테스트하였습니다. Volume 사이즈가 235MB가 나오네요.
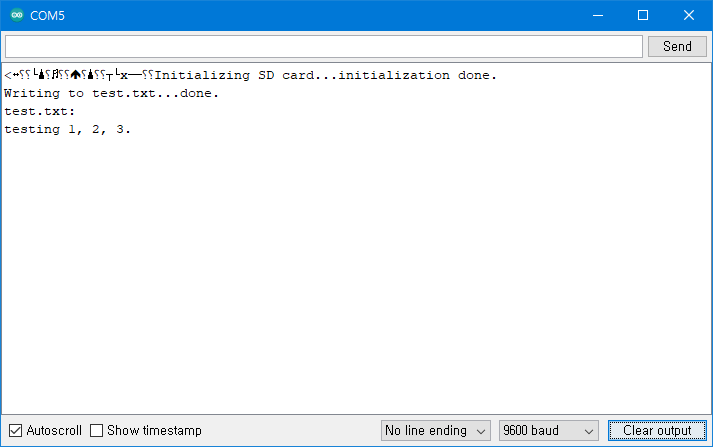
기본적인 읽기 동작은 잘 동작되니 다음은 Generic ESP8266 module에서 제공되는 SD 예제 중 ReadWrite 예제를 테스트해 보았습니다. 간단히 test.txt 파일을 생성 후 데이터를 쓰고 다시 읽어 오는 동작을 하는 간단한 코드입니다.
/*
  SD card read/write

  This example shows how to read and write data to and from an SD card file
  The circuit:
   SD card attached to SPI bus as follows:
 ** MOSI - pin 11
 ** MISO - pin 12
 ** CLK - pin 13
 ** CS - pin 4

  created   Nov 2010
  by David A. Mellis
  modified 9 Apr 2012
  by Tom Igoe

  This example code is in the public domain.

*/

#include <SPI.h>
#include <SD.h>

File myFile;

void setup() {
  // Open serial communications and wait for port to open:
  Serial.begin(9600);

  Serial.print("Initializing SD card...");

  if (!SD.begin(4)) {
    Serial.println("initialization failed!");
    return;
  }
  Serial.println("initialization done.");

  // open the file. note that only one file can be open at a time,
  // so you have to close this one before opening another.
  myFile = SD.open("test.txt", FILE_WRITE);

  // if the file opened okay, write to it:
  if (myFile) {
    Serial.print("Writing to test.txt...");
    myFile.println("testing 1, 2, 3.");
    // close the file:
    myFile.close();
    Serial.println("done.");
  } else {
    // if the file didn't open, print an error:
    Serial.println("error opening test.txt");
  }

  // re-open the file for reading:
  myFile = SD.open("test.txt");
  if (myFile) {
    Serial.println("test.txt:");

    // read from the file until there's nothing else in it:
    while (myFile.available()) {
      Serial.write(myFile.read());
    }
    // close the file:
    myFile.close();
  } else {
    // if the file didn't open, print an error:
    Serial.println("error opening test.txt");
  }
}

void loop() {
  // nothing happens after setup
}
위 예제를 실행해 보니 test.txt 파일을 사용하여 Write/Read 동작이 잘 동작되었다고 로그가 나옵니다.
MicroSD 카드를 제거 후 PC에 연결하여 test.txt를 읽어 보았습니다.
잘 저장이 되어져 있습니다. 더불어 파일 형식이 UTF-8로 저장이 되어 있습니다.
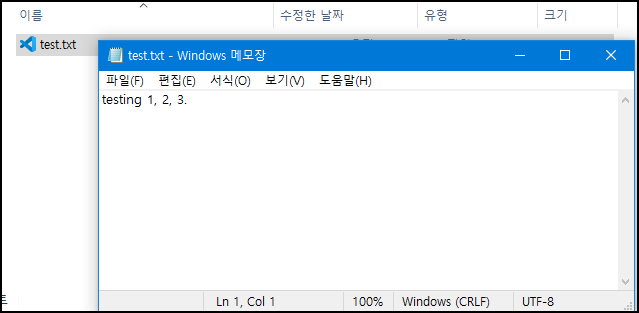
ESP-12F(ESP8266) 모듈을 사용하여 기본적인 Read/Write 기능이 제대로 동작되는 것을 확인할 수 있었습니다.
'Hardware > ESP' 카테고리의 다른 글
| ESP32-WROOM-32 Breakout 보드 제작 (6) | 2022.12.28 |
|---|---|
| ESP-12F 모듈 원본 롬으로 복구하기 (0) | 2021.06.01 |
| ESP32-CAM 사용하기 (0) | 2020.11.30 |
| ESP-12F 모듈 사용하기 (0) | 2020.11.29 |
| ESP-12F 모듈 구매 (0) | 2020.11.29 |


댓글