반응형
|
아래 테스트는 Raspbian GNU/Linux 10 (buster)에서 테스트되었습니다. |
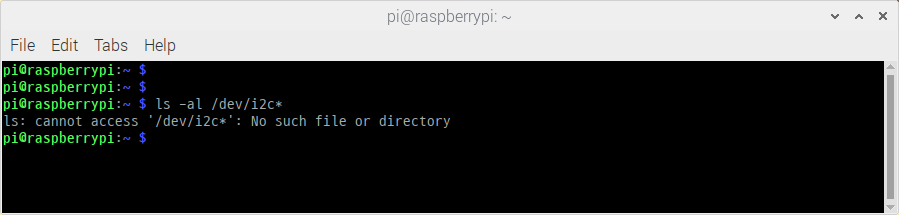
라즈베리파이에서 i2c를 사용하기 위해서 먼저 터미널창에서 "ls -al /dev/i2c*" 명령어를 사용하여 i2c 디바이스 드라이버가 생성되어 있는지를 먼저 확인 해 봐야 합니다. 사용할 수 있는 i2c 드라이버가 현재는 없습니다.
Raspberry Pi Configuration창의 Interfaces에 있는 I2C를 활성화 합니다.

활성화 후 다시 "ls -al /dev/i2c*" 명령어를 사용하면 i2c-1 이 생성되어 있습니다.

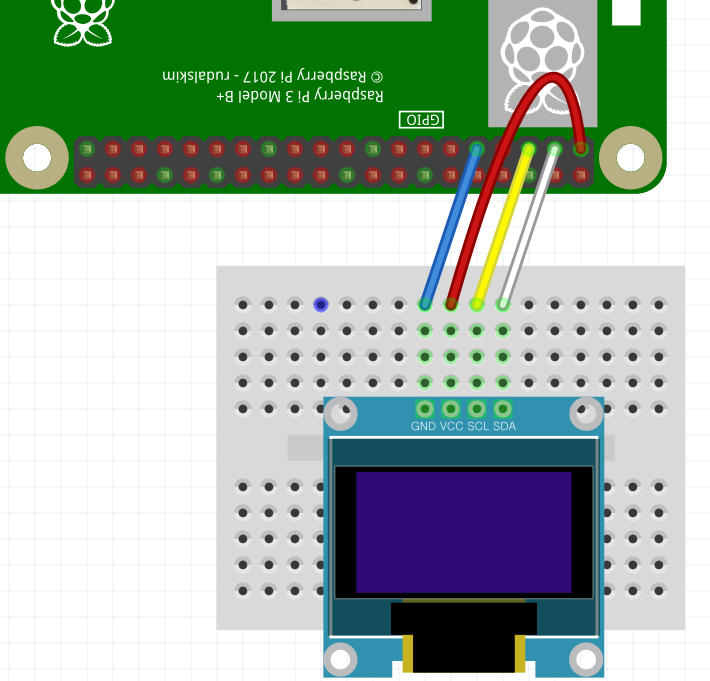
라즈베리파이와 SSD1306 OLED 디스플레이를 아래와 같이 연결합니다.
아래 명령어를 사용하여 adafruit에서 제공되는 python 코드를 다운로드 받습니다.
git clone https://github.com/adafruit/Adafruit_Python_SSD1306.git
cd Adafruit_Python_SSD1306
sudo python setup.py install

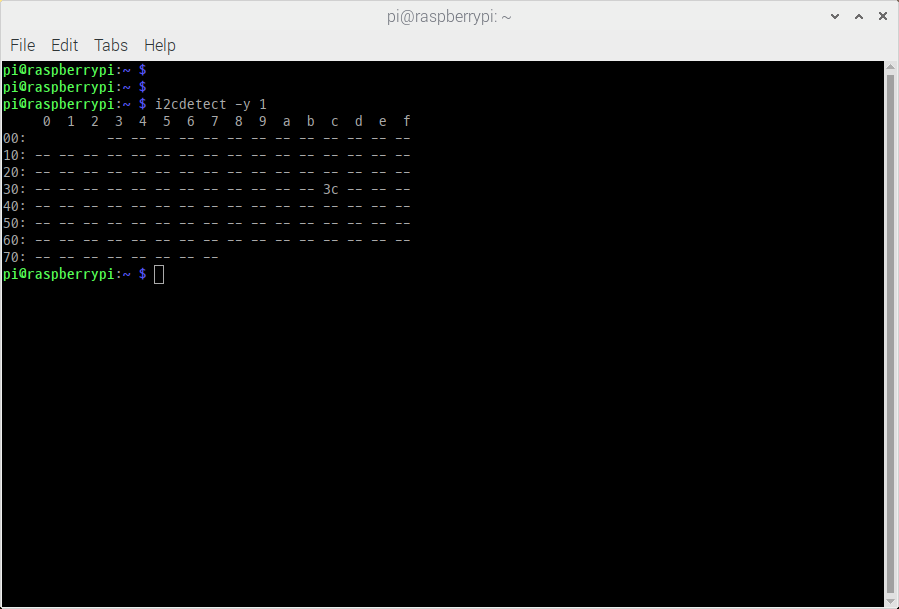
i2cdetect를 사용하여 OLED의 I2C 주소를 확인 해 봅니다. 0x3C로 검색되었습니다.
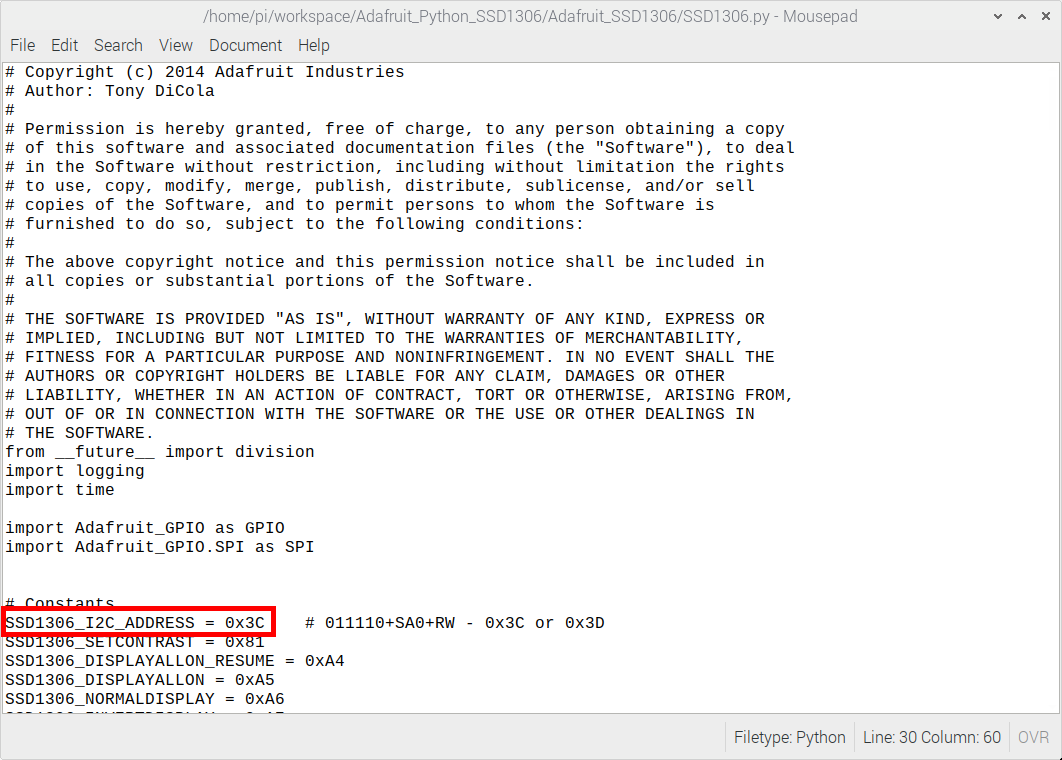
0x3C일 경우 default값이라 수정 할 필요가 없지만, 만약 0x3C가 아닌 다른 값이라면 아래 소스코드에서 붉은색 박스의 값을 변경 해 줘야 정상동작합니다.
아래 명령어를 사용하여 몇 가지 예제 중 저는 image.py를 실행 해 보았습니다. 잘 동작됩니다.
cd examples
python image.py
정상적으로 잘 동작되는것을 확인 후 아래 이미지를 간단히 만들어서 테스트 해 보았습니다.

128x64 OLED설정에 맞게 아래와 같이 수정하였습니다.
# Copyright (c) 2014 Adafruit Industries
# Author: Tony DiCola
#
# Permission is hereby granted, free of charge, to any person obtaining a copy
# of this software and associated documentation files (the "Software"), to deal
# in the Software without restriction, including without limitation the rights
# to use, copy, modify, merge, publish, distribute, sublicense, and/or sell
# copies of the Software, and to permit persons to whom the Software is
# furnished to do so, subject to the following conditions:
#
# The above copyright notice and this permission notice shall be included in
# all copies or substantial portions of the Software.
#
# THE SOFTWARE IS PROVIDED "AS IS", WITHOUT WARRANTY OF ANY KIND, EXPRESS OR
# IMPLIED, INCLUDING BUT NOT LIMITED TO THE WARRANTIES OF MERCHANTABILITY,
# FITNESS FOR A PARTICULAR PURPOSE AND NONINFRINGEMENT. IN NO EVENT SHALL THE
# AUTHORS OR COPYRIGHT HOLDERS BE LIABLE FOR ANY CLAIM, DAMAGES OR OTHER
# LIABILITY, WHETHER IN AN ACTION OF CONTRACT, TORT OR OTHERWISE, ARISING FROM,
# OUT OF OR IN CONNECTION WITH THE SOFTWARE OR THE USE OR OTHER DEALINGS IN
# THE SOFTWARE.
import time

import Adafruit_GPIO.SPI as SPI
import Adafruit_SSD1306

from PIL import Image


# Raspberry Pi pin configuration:
RST = 25
# Note the following are only used with SPI:
DC = 24
SPI_PORT = 0
SPI_DEVICE = 0

# Beaglebone Black pin configuration:
# RST = 'P9_12'
# Note the following are only used with SPI:
# DC = 'P9_15'
# SPI_PORT = 1
# SPI_DEVICE = 0

# 128x32 display with hardware I2C:
#disp = Adafruit_SSD1306.SSD1306_128_32(rst=RST)

# 128x64 display with hardware I2C:
disp = Adafruit_SSD1306.SSD1306_128_64(rst=RST)

# 128x32 display with hardware SPI:
# disp = Adafruit_SSD1306.SSD1306_128_32(rst=RST, dc=DC, spi=SPI.SpiDev(SPI_PORT, SPI_DEVICE, max_speed_hz=8000000))

# 128x64 display with hardware SPI:
# disp = Adafruit_SSD1306.SSD1306_128_64(rst=RST, dc=DC, spi=SPI.SpiDev(SPI_PORT, SPI_DEVICE, max_speed_hz=8000000))

# Initialize library.
disp.begin()

# Clear display.
disp.clear()
disp.display()

# Load image based on OLED display height.  Note that image is converted to 1 bit color.
#if disp.height == 64:
#    image = Image.open('happycat_oled_64.ppm').convert('1')
#else:
#    image = Image.open('happycat_oled_32.ppm').convert('1')

# Alternatively load a different format image, resize it, and convert to 1 bit color.
image = Image.open('test.png').resize((disp.width, disp.height), Image.ANTIALIAS).convert('1')

# Display image.
disp.image(image)
disp.display()
제가 만든 이미지가 정상적으로 잘 나옵니다.
라즈베리파이에서 I2C가 정상적으로 동작되는것을 확인 해 보았습니다.


반응형
'Hardware > Raspberry PI' 카테고리의 다른 글
| [라즈베리파이 3B+] UART 사용하기 (0) | 2020.12.27 |
|---|---|
| [라즈베리파이 3B+] SPI 사용하기(SSD1306 OLED 사용) (0) | 2020.12.27 |
| [라즈베리파이 3B+] RPi.GPIO 입/출력 사용하기(Python) (0) | 2020.12.26 |
| [라즈베리파이 3B+] RPi.GPIO 살펴보기(Python) (0) | 2020.12.24 |
| [라즈베리파이 3B+] 스크린 캡쳐 사용하기(scrot 사용하기) (0) | 2020.12.16 |


